Hardness is an important performance parameter of thermoplastic elastomer TPE and TPR. For general products, the hardness of TPE and TPR materials is required to be within the standard hardness range of ± 3-5 degrees (A). Some products with high requirements for softness and hardness, such as earphone cables, soft TPE products (such as ultra soft fun products with a hardness of 0-15A), even require TPE material hardness to be within the standard hardness range of ± 2 degrees (A). The determination of hardness is very important for the confirmation of new product TPE and TPR material samples. Sometimes, inaccurate determination of material sample hardness may lead to inaccurate determination of sample material hardness, resulting in the sample hardness not meeting customer requirements.
The TPE/TPR sample hardness test is not accurate due to the following factors:
1. Factors affecting the Shore hardness tester
1.1 Effect of Needle Length on Test Results
The standard stipulates that the height of the pressure needle of the Shore A hardness tester exposed to the pressure surface is 2.5mm, and the pointer should point to zero point in the free state. When the pressure needle is on a smooth metal plate or glass, the instrument pointer should indicate 100 degrees. If the indication is greater than or less than 100 degrees, it indicates that the exposed height of the pressure needle is greater than or less than 2.5mm or less. In this case, it should be stopped for calibration. When the exposed height of the pressure needle is greater than 2.5mm, the measured hardness value is higher.
1.2 The influence of the shape of the needle tip on the test results
Under long-term action, the end of the pressure needle of the Shore A hardness tester causes wear, which changes its geometric size and affects the test results. The larger the diameter of the worn end, the larger the measured result, which is due to the different pressure per unit area. If the diameter is large, the pressure is small, and the measured hardness value is larger, otherwise it is smaller.
2. Environmental temperature factors
Rubber is a polymer material, and its hardness value changes with the environment. When the temperature is high, the hardness value decreases. The degree of influence varies with different rubber materials, such as natural rubber with slow crystallization rate, which is less affected by temperature, while chloroprene rubber, styrene butadiene rubber, etc. have a significant impact. The hardness of TPE and TPR materials with the same formula is about 5 degrees harder in winter than in summer (A).
3. The impact of reading time
The reading time of Shore A hardness tester has a significant impact on the test results during measurement. The difference between the readings obtained by the pressure needle and the sample immediately after compression and the readings obtained by the pointer after stabilization is significant. The former is higher, while the latter is lower, with a difference of about 5 to 7 degrees. This is particularly significant in synthetic rubber testing, which mainly leads to creep of the rubber material after compression. Generally, the sample should be read immediately after being compressed (note).
4. The influence of sample (test piece) thickness
The hardness of the TPE material measured is related to the measurement method and the thickness of the parts. The thicker the product made of the same TPE model material, the harder it feels, although the actual thickness is not related to the material hardness. The ASTM method specifies a test specimen thickness of 0.250 inches (approximately 6.35mm of specimen thickness), which is the range in which hardness is not affected by thickness.
Note: Most materials can withstand initial pressure, but over time, they will yield due to creep and relaxation. The reading of the hardness tester can be read immediately or after a specific delay time, usually after 5 to 10 seconds. Real time readings usually display higher (or harder) readings than delayed readings. Delayed readings are more representative not only for the hardness of the material but also for its resilience. Weaker and less elastic materials are more prone to creep compared to stronger and more elastic materials.
Related knowledge:
1. The penetration depth of the pressure needle.
The most commonly used instrument for measuring hardness is called a Shore hardness tester. The penetration depth measured by this instrument is from zero to 0.100 inches (approximately 2.5mm). If the reading on the scale is zero, it means that the indenter has penetrated the limit depth. Similarly, a reading of 100 indicates that the indenter has not penetrated.
2. Selection of hardness testers for materials with different hardness ranges.
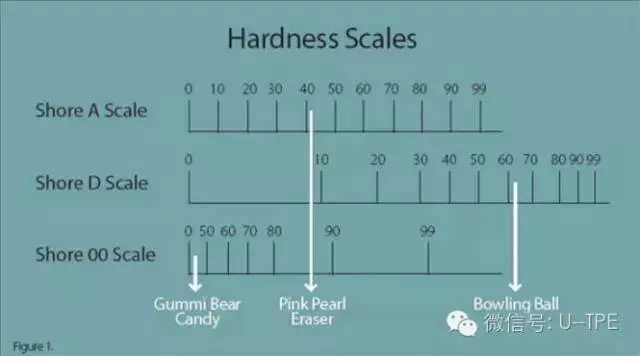
There are three types of Shore hardness testers, namely Shore A hardness tester, Shore D hardness tester, and Shore OO hardness tester. Shore hardness tester A, generally testing the hardness range of 30-90A is relatively accurate. If the hardness is lower than 30A, use a Shore hardness OO table for testing; If the hardness is higher than 90A, the Shore hardness D-scale test results are more accurate (as shown in the following figure).

